Fee Items Management Guide
1. Add a New Fee Item
Step 1: Navigate to Finance -> Fee Configuration -> Fee item
Step 2: On the Fee Item page, click the + Create button and select Fee Item
Finance Admin and Centre Admin can create Fee Items
Fee Items will be listed as Active under “HQ Items” (for Finance Admin) or “Centre Items” (for Centre Admin)
Enter all required details
Please select the effective date and tick for any centre(s) you wish to assign the fee to, and click next
After checking the list of centre(s) which assigned with those fee items, can click "Create Fee Item"
Finance Admins:
Can assign Fee Items to one or multiple centres, or save without assignment
Can override the default GST rate for the current period during setup
Centre Admins:
Must assign Fee Items to one or multiple centres before saving (limited to centres with CA permissions)
2. Assign a Fee Item to Centres
- As Finance HQ, you can select a fee item from the listing by clicking the 3-dot button and choosing "Assign to Centres" (bulk action is not available).
- Or, you can also go to the Fee Item Details page and click on the Fee Item Action button, then select Assign To Centres
- Set the effective date to assign fee item and tick the centre(s) and click Next
Review the centre name(s) to ensure the fee items will be applied to the correct centre(s), then click Assign.
3. Unassign a Fee Item
Step 1: Finance -> Fee Configuration select the Fee item that you wish to unassign.
Step 2: Open the Assigned Centres tab
Step 3: Use the 3-dot menu (single selection) or the Bulk Action button (multiple) → select Unassign From Centres
Can unassign from pending or active centres
Unassigning does not impact previously generated billing documents
Fee Item will be removed from the list available when adding programmes to a child at the centre
Type "Unassign Fee item" and click Confirm.
4. Edit a Fee Item
Step 1: Select the Fee Item from the listing
Step 2: Go to the Fee Item Details page → click Edit Info
once finish, please process to click Save
Type "SAVE FEE ITEM" and click Confirm.
All fields can be edited except for the Conditional Group
You must set a new Effective Date
Changes will be recorded in Pending Activity and Activity Log
Document dates must align with the new effective date
Pending Activity cannot be canceled if any billing document has been issued using the updated values
5. Archive a Fee Item (Finance HQ)
- As Finance HQ, you can see and edit all 3 tabs (HQ Item, Centre Item, and Archived) displayed under Fee Item
- You can archive 1 fee item from the listing by clicking on the 3-dot button or the Bulk Action button (for multiple selections) then choose Archive
- Or, you can also go to the Fee Item Details page and click on Fee Item Action button, then select Archive
- Once completed, the Fee Item will be automatically removed from the student billing plan. The action will also be recorded in the Activity Log
- Archiving Fee Items will not impact previously generated documents and will remove the Fee Item from the list available for adding programs to a child in the centre
Type "ARCHIVE FEE ITEM" and click Confirm.
5. Archive Fee Item (by Centre)
- Both HQ Admins and Centre Admins will always see 3 tabs on this screen. HQ Admins can view the "Centre Item" tab, see and edit all items created by the Centre Admins. Meanwhile, Centre Admins only have view-access to the "HQ Item" tab
- Under the Centre Items tab, Centre Admins can only see the Archive button for Fee Item details associated with their respective centres
- Centre Admin can also do this from the Fee Item Details page
6. Unarchive a Fee Item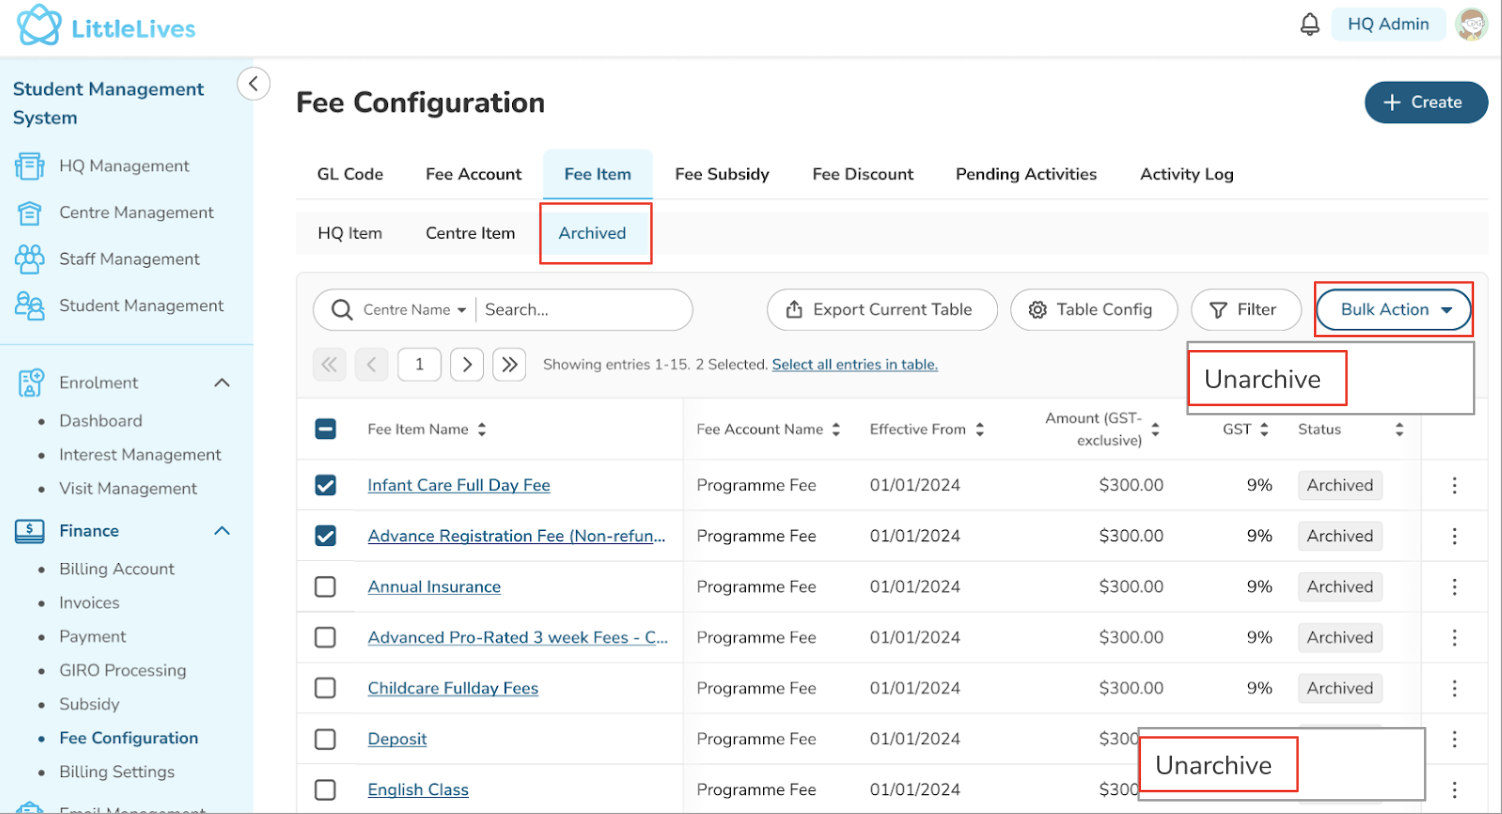
Option 1: From the Archived tab, select the item → click Bulk Action → select Unarchive
Option 2: From the Fee Item Details page → click Fee Item Action → select Unarchive
The Fee Item will return to the Active list
It will again be available for selection when assigning programmes to a child